Creating tileable noise maps
Creating a tileable image in Photoshop is easy; crop an image, take the cropped right and bottom and stick it left and top with a fade. But creating proper tileable noise maps is a bit trickier to get your head around if you want to do it right.
If you have a basic understanding of Perlin noise you’ll know that it consists of interpolated random numbers. People mostly use it in two dimensions. But it’s also useful in one dimension (movement for instance), in three dimensions (cylindrical and spherical mapping of 3D objects) and even four or five dimensions.
You can use four dimensional noise to create a tileable 2D image. Thinking in four dimensions is not an everday practice so we’ll take it one dimension at a time.
In the examples I’ve used Simplex noise with two octaves. Simplex noise is faster in higher dimensions and it looks better because of it’s triangular nature.
I’ve written a small function called drawNoise to deal with canvas creation and pixel array looping. You can download the examples here.
One dimensional tileable noise
In one dimension the noise is an endless smooth line (my noise implementation starts at two so I’m using a constant for the second parameter). Here you can still really see it’s just interpolated random numbers.
// one dimensional line
fNoiseScale = .02;
drawNoise(function(i,x,y){
    var v = Simplex.noise(
         123+x*fNoiseScale
        ,137 // we just need one dimension so this parameter is a constant
    );
    return v*iSize>y?255:0;
}).img();
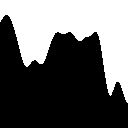
You can use this in your animation by recalculation the noise value for each millisecond but you could also create a loop and precalculate the values. The values in the image above do not loop. But looping is quite easy, all it takes is an extra dimension and a loop… or eeh circle.
A one dimensional loop
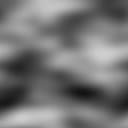
For most of you Perlin noise looks something like the following image.
If we were to draw a circle in there and read out the noise values on that circle we’d have a one dimensional loop.
In code this looks like this:
// one dimensional loop
drawNoise(function(i,x,y){
    var fNX = x/iSize // we let the x-offset define the circle
        ,fRdx = fNX*2*Math.PI // a full circle is two pi radians
        ,a = fRdsSin*Math.sin(fRdx)
        ,b = fRdsSin*Math.cos(fRdx)
        ,v = Simplex.noise(
             123+a*fNoiseScale
            ,132+b*fNoiseScale
        )
    ;
    return v*iSize>y?255:0;
}).img().div(2);
You can probably already see where we are going with this. For looping a two dimensional image we’ll need a three dimensional noise map (at least).
A cylindrical map
Perlin noise was originally created for continuous 3D texturing (Tron). Instead of the image map being a piece of paper wrapped around an object the image map is calculated by the location in the three dimensional noise field. So when slicing the object you’d still be able to calculate the map for the newly created surface.
Before our ultimate goal of a tileable image we will first create one that just tiles left and right. It’s like the two dimensional circle for our one dimensional loop but with one extra dimension: a cylinder.
// three dimensional cylindrical map
drawNoise(function(i,x,y){
    var fNX = x/iSize
        ,fRdx = fNX*2*Math.PI
        ,a = fRdsSin*Math.sin(fRdx)
        ,b = fRdsSin*Math.cos(fRdx)
        ,v = Simplex.noise(
             123+a*fNoiseScale
            ,132+b*fNoiseScale
            ,312+y*fNoiseScale // similar to the one dimensional loop but we add a third dimension defined by the image y-offset
        )
    ;
    return v*255<<0;
}).img().div(2);
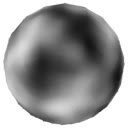
A spherical image map
You might think a sphere would come in handy for our tileable image but you’re wrong.
As a small sidestep I’ll show you how to calculate a spherical image map and what it looks like.
// three dimensional spherical map
document.body.addChild('h2').innerText = 'three dimensional spherical map';
fNoiseScale = .1;
var oSpherical = drawNoise(function(i,x,y){
    var  fNX = (x+.5)/iSize // added half a pixel to get the center of the pixel instead of the top-left
        ,fNY = (y+.5)/iSize
        ,fRdx = fNX*2*Math.PI
        ,fRdy = fNY*Math.PI // the vertical offset of a 3D sphere spans only half a circle, so that is one Pi radians
        ,fYSin = Math.sin(fRdy+Math.PI) // a 3D sphere can be seen as a bunch of cicles stacked onto each other, the radius of each of these is defined by the vertical position (again one Pi radians)
        ,a = fRdsSin*Math.sin(fRdx)*fYSin
        ,b = fRdsSin*Math.cos(fRdx)*fYSin
        ,c = fRdsSin*Math.cos(fRdy)
        ,v = Simplex.noise(
             123+a*fNoiseScale
            ,132+b*fNoiseScale
            ,312+c*fNoiseScale
        )
    ;
    return v*255<<0;
}).img();
Cubical panorama map
The sphere we just made can also be used as a panorama if we’d put the camera in the center of the sphere. But a better technique is a cubical panorama because it has far less faces. The sphere is mapped onto the six sides of a cube as indicated by this sketch.
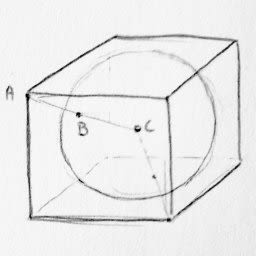
For each pixel on the face of the cube we have to calculate the intersection between our viewpoint C in the center and the sphere. This might sound difficult but really isn’t.
We can perceive the line CA as a vector. And vectors can be normalized, so it’s direction doesn’t change but it’s length is reduced to 1. Which makes all our vectors together look like a sphere.
Normalization is also quite simple, we just have to divide the xyz values of the vector with the total length of the vector. The length of the vector can be calculated using the theorem or Pythagoras.
In the code below you can see the normalize calculation is first done for a single face. Then the noise is calculated for al six faces simultaneously since its just a matter of swapping xyz values to get the position on another face.
// 3D panoramical cube map
document.body.addChild('h2').innerText = '3D panoramical cube map';
// we're not using the drawNoise function because our canvas is rectangular
var mCubemap = document.createElement('canvas')
    ,iW = 6*iSize;
mCubemap.width = iW;
mCubemap.height = iSize;
var  iHSize = iSize/2 // half the size of the cube
    ,oCtx = mCubemap.getContext('2d')
    ,oImgData = oCtx.getImageData(0,0,iW,iSize)
    ,aPixels = oImgData.data
    ,aa = 123
    ,bb = 231
    ,cc = 321
;
for (var i=0,l=iSize*iSize;i<l;i++) {
    var  x = i%iSize		// x position in image
        ,y = (i/iSize)<<0	// y position in image
        ,a = -iHSize + x+.5	// x position on the cube plane, the added .5 is to get the center of the pixel
        ,b = -iHSize + y+.5 // y position on the cube plane
        ,c = -iHSize		// z position of the cube plane
        ,fDistanceAB = Math.sqrt(a*a+b*b) // to calculate the vectors length we use Pythagoras twice
        ,fDistanceABC = Math.sqrt(fDistanceAB*fDistanceAB+c*c)
        ,fDrds = .5*fDistanceABC // adjust the distance a bit to get a better radius in the noise field
        ,v = 1
    ;
    a /= fDrds; // normalize the vector
    b /= fDrds; // normalize the vector
    c /= fDrds; // normalize the vector
    //
    // since we now know the spherical position for one plane we can derive the positions for the other five planes simply by switching the x, y and z values (the a, b and c variables)
    var aNoisePositions = [
         [a,b,c]	// back
        ,[-c,b,a]	// right
        ,[-a,b,-c]	// front
        ,[c,b,-a]	// left
        ,[a,c,-b]	// top
        ,[a,-c,b]	// bottom
    ];
    for (var j=0;j<6;j++) {
        v = Simplex.noise(
             aa + aNoisePositions[j][0]
            ,bb + aNoisePositions[j][1]
            ,cc + aNoisePositions[j][2]
        );
        var pos = 4*(y*iW+j*iSize+x); // the final position of the rgba pixel
        aPixels[pos] = aPixels[pos+1] = aPixels[pos+2] = v*255<<0;
        aPixels[pos+3] = 255;
    }
}
oCtx.putImageData(oImgData,0,0);
document.body.addChild('img',{src:mCubemap.toDataURL("image/jpeg")});
Here are the six sides stuck into a single image plus a screenshot of what it looks like from within the cube. The source code also has an actual 3D example done with threejs.

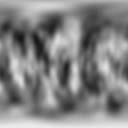
A 2D tileable image
A 2D tileable image might seem easy but I find it the most difficult of the ones I described here because understanding it requires you to think in four dimensions. The closest we really got was the cylindrical map (with it’s horizontal repeat), so we’ll take that as our starting point.
In the cylindrical map we used the image horizontal position for the circle; so the horizontal image position provided us with two coordinates x and y in the noise xyz field. The image’s vertical position corresponded to z in the noise field.
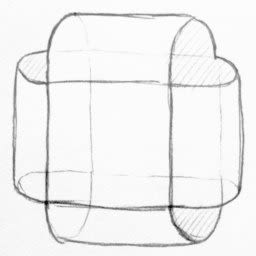
We also want the image to tile vertically so if we add an extra dimension we can use it to create a second circle to replace the fields linear z value. It’s almost like creating two cylinders in a four dimensional field. I tried to vizualize it a bit in the following sketch, it’s not accurate but I’m trying to convey the general idea, not draw a four dimensional cylinder.
The code pretty straightforward; just two circles in four dimensional noise space.
// four dimensional tile
fNoiseScale = .003;
drawNoise(function(i,x,y){
    var  fNX = x/iSize
        ,fNY = y/iSize
        ,fRdx = fNX*2*Math.PI
        ,fRdy = fNY*2*Math.PI
        ,a = fRds*Math.sin(fRdx)
        ,b = fRds*Math.cos(fRdx)
        ,c = fRds*Math.sin(fRdy)
        ,d = fRds*Math.cos(fRdy)
        ,v = Simplex.noise(
             123+a*fNoiseScale
            ,231+b*fNoiseScale
            ,312+c*fNoiseScale
            ,273+d*fNoiseScale
        )
    ;
    return (Math.min(Math.max(2*(v -.5)+.5,0),1)*255)<<0;
}).img().div(2,2);
And here’s the result: